Let's Draw Insulator Shapes
by Jack H. Tod
Reprinted from "INSULATORS - Crown Jewels of the Wire", September 1972, page 7
Some collectors have occasion to make drawings of insulators
to record their specimens, report new finds to the magazine,
or just for the heck of it. The drawings in the porcelain
Universal Style Chart and the glass Consolidated Design
charts are accurately made with very elaborate profiling
machines and photo-mechanical setups, but there are several
methods collectors can use to make pretty fair drawings. The
one below is the easiest and yet gives very good results. It
requires only a pencil, ruler, drafting triangle and carbon
paper. Although not necessary, it also helps to have large
calipers and a small light-box.
Assuming the light 7 1/2' above the floor, the error in drawing
size (too large) ranges from 1.12% for a 2" insulator up to
3.45% for a 6" one. You can eliminate almost all error by
determining the half-widths for the centerline by measuring
the specimen with calipers and by adjusting the base upwards
to actual insulator measurement. The errors can be reduced
to absolute zero by using the sun as a light source, but
setup is a bothersome thing. Insulator and the paper must be
kept in the plane normal to rays of the sun.
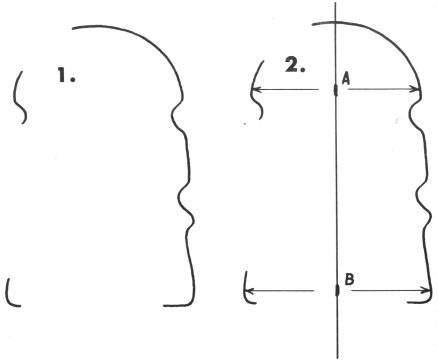
PROCEDURE. Unscrew all but one bulb from the ceiling fixture
and place insulator on paper directly underneath it on a
smooth floor. Prop up insulator level and make the shadow
outline as shown in Figure 1. Then go to your desk.
Determine centerline points A and B as shown, or for greater
accuracy measure insulator at those points and set marks in
half the diameters from the right hand profile.
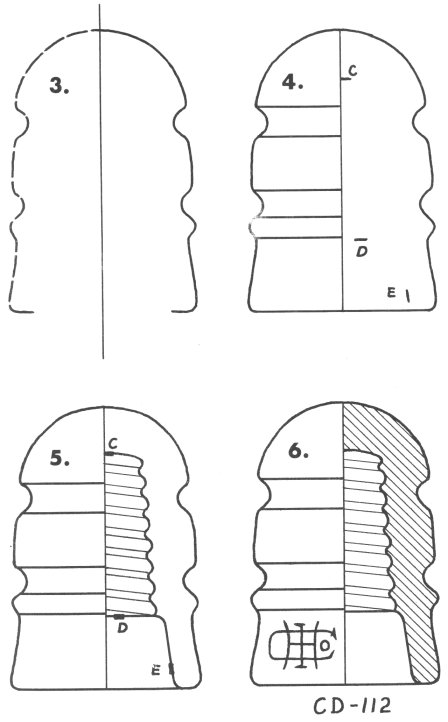
Fold paper on centerline, markings outside. Place on top of
carbon paper (carbon facing up) with insulator profile
upwards. Trace profile, and carbon duplicates this on under
side as in Figure 3. Now unfold and add horizontal lines as
in Figure 4. Measure pin hole depth C, threads collar height
D and skirt width E. Add these marks to your drawing.

Now, as in Figure 5, complete internal surface through
points D and E. Cut out the threads template provided here
and place this behind your drawing, with the centerlines
matched up and with threads top brought to point C. Trace
threads. A light-box helps for this, or put a lamp under
your glass coffee table. If don't have, hold up to window.
Complete the drawing by adding cross-hatching as shown in
Figure 6. For methods to easily duplicate the insulator
marking as shown here, tune in next month - same magazine'.
The drawings here are 80% size per magazine reduction, but
the threads template is actual size here (1" threads).
For use in magazine, do not use blue or green pencil or ink
which will not come out on photo. Use black pencil or ink.
Make work lines in light blue pencil if you want, as these
won't show up in the photo. If it takes you more than 5
minutes to make your drawing, you're doing something wrong!


If your insulator has petticoats
or other internal details, you
can add theme by measuring them
as shown here. Place a straight
edge across the bottom and make
pertinent measurements as shown
in Figure 7. Your shadow drawing should already look
like Figure 8, and you can add in theme measured points.
As in Figure 9, connect up these points and you're done.
Similarly, you can also add details which don't show in
the shadow-crown details, undercut side skirts, etc.
|


